GIG reference manual
GIG intercol maps tutorials
____________________________________________________________________________________
____________________________________________________________________________________

A simple example of the conditional map.
- Click with the left mouse in the text box.
- Type in the text box:
- vchess(10,10) < 0.5 ? red : blue
- Type in the map name entry box a map name, for example chess.
- Select create map. A Map Frame with name chess is created.
- Select diffuse from the texture listbox.
- Click the map in the color field of the diffuse.


____________________________________________________________________________________
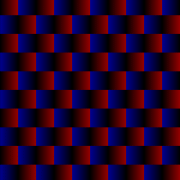
The chess map is used to combine two maps
into one chessboard pattern.
- Click with the left mouse in the text box.
- Type in the text box:
- vchess(10,10) < 0.5 ? (ffract(10*mu())) : (ffract(10*(1-mu())))
- Type in the map name entry box a map name, for example morechess.
- Select create map. A Map Frame with name morechess is created.
- Select diffuse from the texture listbox.
- Click the map in the intensity field of the diffuse.
- If the map of the previous example was saved, click that map in
the color field of the texture.
Another example:

- Click with the left mouse in the text box.
- Type in the text box:
- vchess(10,10) < 0.5 ? (noise(0.1)) : (sin(pi*4*mv()))
- Type in the map name entry box a map name, for example onemorechess.
- Select create map. A Map Frame with name onemorechess is created.
- Select diffuse from the texture listbox.
- Click the map in the intensity field of the diffuse.
____________________________________________________________________________________

In this example a sine function is used to create a wave
pattern.
- Click with the left mouse in the text box.
- Type in the text box:
- bars = sin(10*pi*mv()) ; <enter>
- trfmap(bars,mu(),mv()+0.1*sin(mu()*2*pi))
- Type in the map name entry box a map name, for example waves.
- Select create map. A Map Frame with name waves is created.
- Select diffuse from the texture listbox.
- Click the map in the intensity field of the diffuse.
- Select a cube or plane from the files from the preview window.
____________________________________________________________________________________

The following mathematical functions create all the same map.
- Click with the left mouse in the text box.
- Type in the text box one of the three functions below (all three
will evaluate to the same map):
- (mu()-0.5)*(mu()-0.5)+(mv()-0.5)*(mv()-0.5)<0.25?red:white
- sqr(mu()-0.5)+sqr(mv()-0.5)<0.25?red:white
- hypot(mu()-0.5,mv()-0.5)<0.25?red:white
- Type in the map name entry box a map name, for example flag.
- Select create map. A Map Frame with name flag is created.
- Select diffuse from the texture listbox.
- Click the map in the color field of the diffuse.
- Select a cube or plane from the files from the preview window.
____________________________________________________________________________________

Keep this one in mind as a nice background scene.
- Click with the left mouse in the text box.
- Type:
- rgbmap(noise(mv()),1,1)
- Type in the map name entry box a map name, for example clouds.
- Select create map. A Map Frame with name clouds is created.
- Select diffuse from the texture listbox.
- Select add parameter and give it name sky.
- Select add parameter and give it name clouds.
- Plug map clouds in parameter clouds.
- Select mv from the maps listbox and plug it into the parameter
sky.
- Type in the color entry box clouds.
- Type in the intensity entry box 0.5 + (1-mv())/2.
____________________________________________________________________________________

Hope you're familiar with Superman.
- Click with the left mouse in the text box.
- Type:
- fracint()<0.5?blue:(fracint()<0.55:yellow:red)
- Type in the map name entry box a map name, for example kryp.
- Select create map. A Map Frame with name kryp is created.
- Select diffuse from the texture listbox.
- Plug map kryp in the color parameter.
- View the map on a ball.
____________________________________________________________________________________

A moonlit scene on a slightly cloudy night.
- Create a scene with a ball and a cube in front of the ball for the
clouds.
- Go to solid construct, select ball
- Go to transform, select keyboard:
size
14 <enter>
- Give it the tagname moon.
- Go to solid construct, select group, select cube
- Go to transform, select xyz size
- x:20 y:20 z:0 <enter>
- z position 45 <enter>
- Give it the tagname sky.
- Create a map for the clouds.
- Select intercol maps.
- Click with the left mouse in the text box.
- Type:
- mbound(fracint(),0.3,0.7)
- Type in the map name entry box a map name, for example clouds.
- Select create map. A Map Frame with name clouds is created.
- Select general.
- Select diffuse from the texture listbox.
- Select bumpnoise from the texture listbox and plug it in the
diffuse.
- Type in the diff_val entry box 0.8.
- Type in the diff_col entry box (1,1,0.8).
- Type in the diff_amb entry box (0.5,0.5,0.4).
- Select moon in the tags listbox.
- Press put tag texture.
- Select refract from the texture listbox.
- Select sky (with side attribute number 0) in the tags listbox.
- Press put tag texture. The whole cube has become transparant now.
- Select diffuse from the texture listbox and plug it in the in the
refract texture.
- Select add parameter of the refract texture and name it clouds.
- Plug the map clouds in the parameter clouds of the refract
texture.
- Type in the refr_val clouds.
- Type in the diff_val 1-clouds.
- Select 6 times the sky attribute number in the tag listbox until
the side attribute number of sky is 6.
- Press put tag texture. The refract texture is put on side number 6
of the cube.
- View the result in the RenderWindow.
____________________________________________________________________________________

Animate water with a mapfunction.
- In 3DGO, create a cube and scale it to a convenient size.
- Water() needs an animation to run, so fix events for example
on frame 0 and frame 100
- Go to attributes, add diffuse and click on bumpmap.
- In the bumpmap-intensitybox type:
water(ripples,height,speed)
For example: water(4,1,1)
- Render the animation
Remarks:
water() is an intercolfile in which 4 bumpwaves are animated towards a
surface for simulation.
This means that the number of ripples possibly can not exceed 20 because
of unpredictable interference.
The heigth is to be set between 0 and 1
The speed should be tested. The movement of the bumpwaves is towards the
objects surface so it is possible to put the centre of one of them on the
objects surface, which I think is an unwanted effect.
For an effective water-look it is best to reflect something in the water
to avoid making oil.