GIG reference manual
Organic tutorial
____________________________________________________________________________________
____________________________________________________________________________________
Tutorial 1 - dynamic spline
- Select a spline skin from solid construct.
- Choose a ball shape.
- Select Organic.
- Add 3 more points to the spline using add point.
- Press reset spline to make the control points evenly spaced.
- Press spline, dynamic and then points.
- The spline points box will pop up.
Note
This box enables you to select multiple points and change their dynamics values (default 0).
- Select all but the upper spline points .
- Now make the selected points dynamic by entering 1 in the dynamics
input box or by dragging the slider to the right.
Pic 1

- Press simulate to start moving the dynamic points (by default there is some gravity which causes the points to move).
- Select the highest spline control point in the point box (the only one that's not dynamic) and drag it around in the camera window during simulation to make the spline move more.
- Press auto orient to get a better shape (notice the difference of the yellow tangent vector directions).
- Press display surface to see the actual skin surface (notice the delay in wireframe drawing).
- Press skin active to deactivate skin drawing, only the spline and it's
control points are drawn.
- Press skin active again to activate skin drawing.
- Press display surface to deactivate slow surface drawing, the control
points of the skin are drawn instead of the actual skin surface (this is by default).
- Click the highest spline control point (the only one that's not
dynamic) and drag it around during simulation to make the spline move
more.
- Click uniform skin and notice the different behavior of the spline control points inside the skin. The points are not attached to the skin anymore, but can move along the spline without influencing the skin.
- Click auto length to get a better tangent (yellow vectors)-length behavior. The length is automatically adapted depending on the distance between the spline control points.
Tips & Tricks
Close the 2 small camera windows (on SGI machines by pressing ALT F9 inside them). This will speed up the redraw time in the remaining window making it play faster.


____________________________________________________________________________________
Tutorial 2 - dynamic skin
Part 1
- Select a spline skin from solid construct.
- Choose a cylinder shape.
- Group 2 cubes to the spline.
- Tag 1 cube "cube" and the other "floor".
- x-y-z size the "floor" by x = 50, y = 1, z =50.
- Then move y = -5.
- Select Organic.
- Using get solid tag select the spline.
- Below the convert button enter:
- rows: 4
- cols: 4
- Press convert.
- Select cube.
Pic 2

- The spline is now converted into a cube of 4 by 4 control points.
- Press dynamic, auto orient and kinematic.
- Activate skin mode by pressing skin.
- Press points to get a Skin Points box.
- Select all skin points by clicking the upper left point with the left mouse button, and moving to the lower right point while keeping the left mouse button pressed. All points should be white indicating that they are selected.
- Press full springs in the Skin Points box to make the dynamic object out of full springs (this means an object will try to maintain its shape).
- Enter 1 in the input box under dynamics.
- Press simulate to start the simulation, the box will fall down...
- Press simulate again to stop the simulation.
- Press reset simulation.
Part 2
- Go to Particles.
- Press collision tag and select floor.
- Press simulate to start the simulation. The box will fall down and bounce against the floor.
- Move the upper spline point so that the spline is slightly rotated.
- Press simulate again to stop the simulation.
- Press reset simulation.
- Select parameters spring, resilience, friction & radius.
- Enter values spring mean = 1000, resilience mean = 0, radius mean = 0.01
Note
increasing the spring value makes the springs stronger. They hold the points together more tightly. Lowering the radius to 0.01 produces a closer collision.
- Enter values friction mean = 1
Note
By changing the mean friction value you can control the amount that the box bounces around. Reset simulate each time you change a parameter.
Notice that when rendering the box will not look like a cube unless surface basis 'bezier 1' was selected in Organic.
Tips & Tricks
Try making a patch shaped spline with a dynamic skin. Make it fall onto a collision ball and see the effect.
____________________________________________________________________________________
Tutorial 3 - bring the skeleton out of the cupboard
- Select a spline skin from solid construct.
- Choose a ball shape and tag "sp1".
- Multiply the spline 3 times, using multiply in Transform.
- Select Organic.
- Add an extra spline control point to all 3 splines.
Note
If the group containing all 3 splines is active then pressing add point
will add a point to each spline. You might want to tag this "all" or
"root".
- Press reset spline to make the control points evenly spaced.
- Press kinematic, auto-orient & auto-length to make the splines kinematic.
- Click on the first control point of "sp2" and drag it around to see
the effect of kinematic. (The first control point of a spline is the one with the yellow tangent pointing in the direction of the spline)
- Now move the spline around until it's upside down and the first point is close to the first points of "sp1". The first control point is used when making branches. It is always the first point of a branch that will be connected to a parent spline.
Pic 3

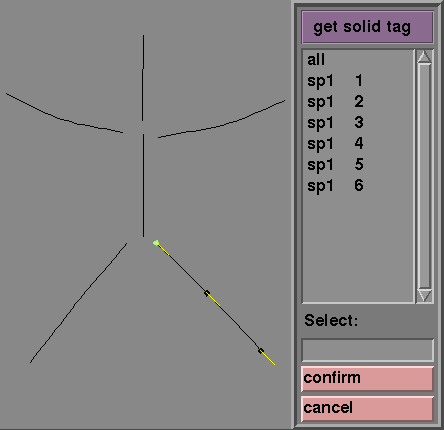
- Click on the first point of "sp1".
- Click branches and double click on "sp2", press confirm.
- Now move the first point of "sp1" around to see the branch effect.
"sp1" is now the parent spline and sp2 is the child.
- Repeat this with "sp3" to give the effect seen in the following picture.
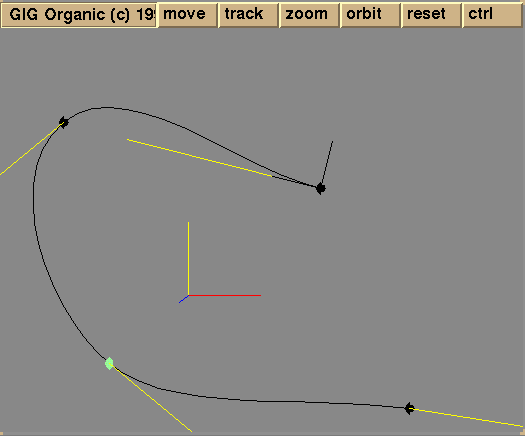
- Activate skeleton mode to see the effect of rotating splines using circle icons. Click on a line pointing
away from the (yellow) circle icon (in the camera window) and move the mouse from left to right to rotate. When rotate x, y, and z are all active, any rotation can be performed.
Pic 4

- Now try making a simple run sequence by animating the splines.
- Select "sp2" and move the spline in to the positions shown in Pic 5
Pic 5

- Press fix on the first position with the timeline set to frame 0.
- Move the timeline to frame 6, deactivate freeze and move the spline to the position shown in Pic 6.
Pic 6

- Continue fixing at frame 12 and 18 for positions 3 and 4, shown in
Pics 7 & 8
Pics 7 & 8


- Then play the animation to see the effect.
- Now fix "sp3" in the same manner, offsetting its animation by 12 frames.
Tips & Tricks
By going back to GIG main menu you can translate the whole skeleton to make it run along while the legs move. Make sure you make the translation linear and not too far or the skeleton will appear to slide rather than run.
____________________________________________________________________________________
Tutorial 4 - a figure using Sculptor and
Organic
- Go to solid construct and get a cylindrical shaped spline.
- Multiply the spline 6 times.
- Tag the top of the splines, i.e. all.
- Go to Organic and get solid tag "all".
- Deactivate the skin by pressing active skin.
- Add a point using add point, this will add a point to the middle of
each spline.
- Activate auto orient, auto length & spline tangent.
- Pull out two splines to make the legs, make sure the tangent of the splines are pointing away from the body.
- Do the same to make 2 arms.
- Then pull out a spline to use as the head spline.
Pic 9
- Position the top points of the leg splines next to the bottom point of the body spline.
- Do the same for the arms, i.e. to the top point of the body spline.
- Pick the bottom point of the body spline and press on branches.
- Select the 2 leg splines and confirm.
- Do the same with the top point in the body spline and connect to the arm splines.
Pic 10

- Go back to the GIG main menu and group a ball to the skeleton.
- Rename the top tag, "all" to "skeleton".
- Multiply the ball 10 times.
- Go to Organic and pick the first ball and press on connect solid.
- Double click on one of the leg splines until it appears twice in the selected list.
- Edit the size, start and end so that it occupies the position of a human thigh.
- Repeat this process connecting 2 solids to each leg or arm spline, 1 solid to the body spline and 1 to the head spline.
Pic 11

- Go back to the GIG main menu and using edit sculpt convert the balls attached to the skeleton into sculpt objects.
Tips & Tricks
By attaching more objects and splines the character can become more complex. Use record in Organic to record animations in real-time and make him dance! Define the in and out points that you want to record the animation by typing in the start and end frames in the timeline boxes. When you are happy press record or Ctrl r to start recording.
____________________________________________________________________________________
Tutorial 5 - funky glass
- Build a freeform glass using freeform rotation.
- Group a cylindrical spline skin to the ff.
- Go to Organic and pick the spline.
- In the rows and cols input boxes type in the values, 30 and 8
Note
For a rotational object such as a glass more rows will be needed than columns.
- Press convert and select the ff and confirm.
- The spline skin will be converted to the shape of the ff, the
resolution can be improved by increasing the rows and cols number.
Pic 12

Tips & Tricks
By locking the lowest point on the spline, and its tangent, and making the
spline auto orient and auto length, you can make the glass animate with
it's base stuck to the ground. Also add one more point to the spline and
turn on uniform skin. By turning off kinematic you can really make it do
some funky stuff!
____________________________________________________________________________________
Tutorial 6 - windy curtains
- Select a spline skin from solid construct.
- Choose the shape patch and tag "curtain1".
- Scale the patch so that is a curtain shape.
- Copy the spline and name the copy "curtain2".
- Position the copy next to the original as they would sit in front of a window.
Pic 13

- Tag the group containing the 2 patches "curtains".
- Group a turbulence particlefield to the group tagged curtains.
- Group a uniform particlefield to the turbulence field.
- It is wise to tag each field, i.e. "turb" and "uni".
- You will have to rotate the uniform field +90 degrees along the x-axis so that it points towards the curtains.
- Go into Organic and select curtain1 using get solid tag, or by choosing solid and picking curtain1's spline.
- Press skin, dynamic and then points.
- Select all the points apart from the top row and, with full springs active, pull thedynamics slider fully over to the right.
Pic 14

- Carry out the same procedure with curtain2.
- Now all the points apart from the top row are dynamic.
- Go to Particles and attach the particle fields to the group "curtains"
as force fields.
- Set the power of the turbulence field to 20 and the uniform field to 1.
- Gravity = 0.2, spring = 200, damp = 10.
- Simulate to see the result.
Tips & Tricks
By animating the power of the particle fields or better, the force parameter using record you
could animate the strength of the "wind" blowing the curtains.
____________________________________________________________________________________
Tutorial 7 - painting with particles
- Select a spline skin from solid construct.
- Choose a cylinder shape spline and tag "brush".
- Group a point particle system to the spline and tag this "paint".
- Go to Organic.
- Select "brush".
- Activate rigid, deactivate spline tangent and skin active.
- Select "paint" and connect to "brush" once using connect solid.
Pic 15

- Go to Particles and pick "paint".
- Parameters:
- gravity 0
- pulse 1
- lifetime 1000
- startangle 0
- startroll 0, 0
- startspeed 0
- Activate connect and show radius.
- Now draw by moving the spline around in the camera window.
Tips & Tricks
Try giving the particle system a colorful map from TextureEditor. If you choose a 3D colormap the particles will change color as they are "sprayed" out of the brush. Also try using record so that you can render the animation of painting with Particles.
____________________________________________________________________________________
Tutorial 8 - 3D skin morphing
- Build a freeform glass using ff rotation and tag it.
- Group a cylindrical spline skin to the ff.
- Group a ball to the model and tag it.
- Group a cylinder to the model and tag it..
- Go to transform and rotate the cylinder 90 degrees around the x axis.
- Go to Organic and pick the spline.
- In the rows and cols input boxes type in the values, 10 and 6
Note
For a rotational object such as a glass or a cylinder more rows will be needed than columns.
- Make sure that skin mode is active by pressing skin.
- Press convert and select the ball and confirm.
- Move the frame counter to frame 1 and press fix.
- Press convert and select the glass and confirm.
- Move the frame counter to frame 25 and press fix.
- Press convert and select the cylinder and confirm.
- Move the frame counter to frame 50 and press fix.
- Press play to view the 3D morphing of the skin.
Tips & Tricks
By also animating the spline by pressing spline and fixing different spline shapes on different frames you can have both keyframed animations of the spline and the skin.
____________________________________________________________________________________
Tutorial 9 - flexible text
- Click text in the solid construct menu and type 'flexible' and tag it.
- group a cylindrical spline skin to the text.
- Go to Organic and select the text.
- Click connect solid and select the spline twice, press confirm.
- Go to transform and rotate the text 90 degrees around the x axis and
90 degrees around the z axis. Scale 0.35 in the y direction and move -0.25
in the x direction and move -0.5 in the y direction.
- Go to Organic and select the spline.
Press skin active to disable the skin. Press dynamic, auto orient, spline, and points. Select the first point in the point box and set its dynamic value to 1.0. Now move the other point around in the camera window and see the effect.
____________________________________________________________________________________
Tutorial 10 - constraints
- Start GIG
- Press set project.
- Choose organic_demo and press confirm.
- Press get ani, choose 'constraints' and press confirm.
- Press tools and double click on Organic; the Organic interface will now come up.
- Click with the left mouse button in the middle of the leftmost spline-skin object (this object, and its middle spline point, get selected).
- Press points.
- The point box pops up. It can be moved if it is in your way.
- Press skeleton.
- The point box switches to skeleton mode. Its header should read 'Spline Points - arm2'. There should be 5 icons in the selection area, with the middle one highlighted.
- Press local in the Angles column of the point box. Switch to local angles, that is where the constraints are applied.
- Press play.
- Watch the difference in behavior between the spline-skin with constraints on the left and the one without constraints on the right. Notice that during the animation the local angles at the selected point stay within their boundaries.
____________________________________________________________________________________
Tutorial 11 - animated wurm along a path
Select a spline-skin from solid construct.
Choose a ball shape.
Select Organic from the tools menu.
Add 2 more points to the spline using add point.
Press skin active to
hide the skin.
- Move the 4 spline points and tangents to create something like this:
Pic 16

Press skin active again.
Press display surface.
Select solid mode.
- Enter 0.25 after the end wheel.
- Move the timeline slider to frame 1 and press fix.
Pic 17

Enter 0.5 after the end wheel.
Move the timeline slider to frame 25 and press fix.
Enter 0.25 after the start wheel.
Move the timeline slider to frame 50 and press fix.
Enter 0.75 after the end wheel.
Move the timeline slider to frame 75 and press fix.
Enter 0.5 after the start wheel.
Move the timeline slider to frame 100 and press fix.
Enter 1.0 after the end wheel.
Move the timeline slider to frame 125 and press fix.
Enter 0.75 after the start wheel.
Move the timeline slider to frame 150 and press fix.
Press play to see a moving wurm along a path.
Tips & Tricks
Try using taper to animate the thickness of the wurm along the path.
Try to make the spline dynamic except for the highest point and see the
wurm crawling along it.
____________________________________________________________________________________
Tutorial 12 - animated connections: fuse
Select a spline-skin from solid construct.
Choose a cylinder shape and tag it 'fuse'.
Press group and particles from solid construct.
Choose a point shape and tag it 'sparks'.
Select Organic from the tools menu.
Press connect solid and select 'fuse' once.
Notice the 'sparks' are transformed to the beginning of the spline because
they had no transformation. (if they would have had a transformation, it would
have been unaffected).
Select the 'fuse' tag using get solid tag.
Press skin active to
hide the skin.
Select spline mode and add 2 more points to the spline using add point.
- Move the 4 spline points and tangents to create something like this:
Pic 18
Select the 'sparks' tag using get solid tag.
Select solid mode.
- Move the timeline slider to frame 1 and press fix.
- Enter 1.0 after the end wheel.
- Move the timeline slider to frame 100 and press fix.
- Go to Particles and change the parameters as show in Pic 19:
Pic 19

Press simulate to see a moving connection (sparks) along a path.
____________________________________________________________________________________